I started this blog when I was restoring a 1917 Kennebec canoe. Now I have added to my boat building adventures, and built a kayak. I also have pages about birds and astronomy.

Sunday, November 20, 2011

Two More Ribs Repaired

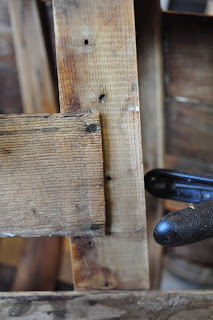
These ribs are the last ones to repair on the bow end.  The other ones that were less than perfect were salvaged by filling the defects with epoxy.  These rib tips will be covered by a cap strip, so they don't have to look good, they just need to be a good structural joint.  I tried to strip the last remaining finish in this area, but it still needs one more go with stripper.


I have been cutting back the broken planks so the new pieces end on a rib.  On these two, I kept two of the original fasteners.   The joints in the planking need to be staggered so two adjacent planks don't end on the same rib.


Here's a look at the skeleton from the inside of the bow. There are still several planks that need to be cut back, but those will wait until I have put some new planks on so I can keep the shape of the hull.

Tuesday, November 15, 2011

New Rib Top

Before:


After:

I cut a scarf joint and made a replacement rib top for the first of about 6 ribs (two at the bow and 4-5 at the stern end).  The tenon jig on the tablesaw works great for cutting the taper for the glue joint.

Sunday, November 13, 2011

New stem installed

I beveled the stem blank on the band saw and did some hand planing to adjust the angle.  The angle varies from tip to keel, so it needs to be adjusted so the planks will lie flat.


The connection at the top has a #6 brass screw up into the deck.  The bottom joint is a scarf joint.  Both ends are glued in place with epoxy.  I took of a few more planking pieces, but I need to add new planks before I take anymore off. The first ribs aren't nailed to the stem, so the planks are holding them in position.  I don't know if there were nails originally, of if the rib ends were just nested up against each other.

Sunday, October 23, 2011

New Bow Tip

I finally glued up the new tip of the bow. This replace the ends of the inner gunwales and the tip of the deck.  The deck tip is cut thicker than the original with a bit extending aft underneath.  This was the first time I used the West system epoxy.  It is a much slower cure than the typical 5 minute epoxy I've used before.  I opted for the slow cure hardener, which is usable down to about 60F. 

Here it is all cured up.  The seams will be covered with the thin cap strips along the edges of the deck. 

Here's what the old pieces look like.  It looks like someone stored the canoe with the tips resting on the ground and the bugs burrowed into it.

Saturday, October 8, 2011

I cut the bow stem for a scarf joint to build it up with the new steam bent pieces.  I need to go from here to the tip of the deck with the new stem.

At the tip of the deck I cut back the inner gunwales to splice in some new pieces. These look simple, but getting everything cut at the right angles and fit together is proving to be a real challenge. The old pieces were full of insect holes, including the tip of the deck, which I also cut off.  The deck has cover pieces that cap the inner gunwales and rib tips, so these joints won't show.


Here's the other side. I had to cut it back further to get to good wood. I used scraps of ash from my failed stem bending attempts to make these parts.

Saturday, October 1, 2011

Mortise and tenon seat frame

This is the bow seat frame.  I'm keeping the original pieces that go from gunwale to gunwale. They were doweled together originally, but I'm going to use mortise and tenon joints. Below is the mortising bit drilling square holes.  Another one of the really great tools my father bought.


And this is one of the new side pieces in the tenon jig on the table saw.  This is a great tool for precise, safe cuts on small stock.


And here are all 4 pieces almost ready to assemble. I still need to do a bit of final fitting and then it's time to glue the frame together.

Saturday, September 17, 2011

Second stem blank

I bent the second stem blank today without any cracking.  The steam box got up to 205F and I steamed the blank for 2 hours.  This time I bent it from the deck end down to the keel, which worked better because the last bit was fairly straight and I had better leverage to bend it.  I tried sawing the bevel on the broken pieces from my first stem bending attempts on the bandsaw and it looks like it will work well if I set the bandsaw table to 15 degrees and saw to the corner of the square stock.

Friday, September 16, 2011

Steam bent stem blank

I took the stem blank off the form today and the springback was much less than the prior attempt.  Looks like it really took the shape.  Getting it up to a higher temperature and steaming for a longer time really made a difference.  I took off the compression strap and clamped it back on the form for safe keeping.  My form is wide enough that I can bend the next one and keep them both on the form.  If time allows, I'll try and bend the second one this weekend..

Sunday, September 11, 2011

Second bending attempt

I changed the steam box setup to use a shorter connection to from the keg to the box and sealed the lid a bit better.  This time the box got up to 210F. The bad news is the insulation board started to warp. It's still holding together, so I think it will last through the end of the project, but if one were to build one for more permanent use, a layer of wood is necessary. 


The bending worked better this time. No cracking sounds and no sign of cracks after sitting overnight on the form.  The higher temperature combined with a 2 hour steaming seems to be what made the difference. I also had Laura helping clamp as I bent the stem.

Tuesday, September 6, 2011

Cracked stem blank

It looks like the 'good' stem I bent yesterday also cracked.  I'll need to try again.  I still have two unbent blanks, so in theory I have enough material.  I can use the cracked one as practice pieces for the next step, which is cutting the blanks to a vee shape on the bandsaw.

Monday, September 5, 2011

Steam bending stem

While the stem blanks were steaming, I rounded off the thwart blank and sanded it. It's a bit lighter than the other one, but I can probably match them up by bleaching the old one or slightly staining the new one.

I soaked stem blanks overnight in the bathtub and then steamed for about an hour at around 190F.   I probably should have made the steam box smaller, so I could have gotten it hotter, but this seemed to work okay.


Bending the wood has to be done slowly, but you can't take all day either.  There is a limit to the working time where the wood is still pliable.  You can't have too many clamps, or clamping points. I added three more holes to clamp to after I was finished.  The first board cracked, which give you a reference point for bending the next one so you don't use too much force, or bend to quickly.


All clamped up, I'll leave this on the form to dry for a week or two.


Sunday, September 4, 2011

Steam box, stems and thwart

I made this box for steam bending the canoe parts.  It's 8 feet long by 1 foot square.  The ends are 3/4" plywood and the sides are foil faced 1" insulation board. I'm hoping the board is good for 212 F.  Eight feet long is long enough to steam the gunwales one end at a time.  

 I cut 4 stem blanks to bend and made a compression strap from nylon webbing and scrap lumber.  I idea behind the compression strap is to force the outer part of the bent wood to be the neutral bend axis and the rest of the cross section to be in compression.  The wood will break if it is in tension during the bending process.


I cut the blank for the replacement thwart using the good one as a pattern. Once I get the profile smoothed up, I'll round off the edges with the router and finish shaping it on the spindle sander.


Saturday, September 3, 2011

Materials

I got my order from Jamestown Distributors (varnish, brush, epoxy) and Northwoods Canoe (new hanger bolts, ring nails, canoe tacks)in the last couple of days.  I also picked through the cedar boards at Menards and found some with few knots and nice vertical grain direction.  I just about to start building instead of taking things apart and stripping finish.

The varnish directions have you start with nicely sanded wood (1), apply the first coat thinned 50% and sand with #220 grit (2), apply coat 2 thinned 25% and sand with #280 grit (3), coat 3 thinned 15% and sand with #280 grit (4), 4 more coats thinned 0-5% and sanded with #400 grit (5, 6, 7, & 8 times to sand the whole canoe interior).

I just bought 1 can so I could do the seats and thwarts. I'm not sure how many cans I'll need to do 7 coats on the whole canoe.

The weather is finally supposed to cool down, so I'll be able to get a bit more work done.

Friday, August 19, 2011

Stem pieces

This is the bow end with more planks removed.  The stem on this end is cut off about where the curve starts.  I'm planning on keeping the splayed end of the stem and splicing on a new curved piece.  Not sure if I need to pull this out. I like this picture, it looks like the bones of a whale.

The stem on the stern was loose because the nails had rusted away, so it was easy to pull it out once the planking nails were pried out.  This one needs to have the curved section replaced too.  I picked up a piece of clear white ash I can use to make the stem pieces.  I think the stems were originally made from cedar, but something a bit harder seems like a good idea.  Ash is also supposed to be a good wood to steam bend. 


Saturday, August 6, 2011

Planking holes and patches

I've pulled off the small patches of planking that were added lat time the canoe was recovered. Between the new holes and the patches, there are a lot of holes in the planking.  Looking carefully at the inside of the planks, there are also many spots that are fairly rotten. I've mapped out the planking plan and marked the bad spots and broken planks.  If I replace planks in longer pieces so the number of joints is kept to a reasonable number, I'm afraid I might as well replace all the planking.  There are really very few places the planking looks good from the inside. 

Sunday, July 31, 2011

I did a bit more stripping today on the rib ends.  It's a very difficult area to clean up with lots of small spaces to scrape.  I use a artist's pallet knife to get into the small spaces.  I pulled off the lower plank on the bow end and did a bit more stripping down in the narrow dark space of the bow. That plank was broken, so it had to come off, plus it gave me a bit more room to work. I also removed the square patch of planking someone put on the last time it was recovered.  They used larger clinch nails than were used elsewhere.  I'm starting to see that I'll end up replacing maybe about half the planking. The planking at the gunwales will come off so I can rebuild the rib ends, the planking at the ends is broken and then there are holes, bad spots etc. 

Saturday, July 30, 2011

It's been a while since I made any progress on the canoe.  It's been over 100 almost every day for weeks and there is only a few hours in the morning that it is tolerable to work out in the garage.

I was trying to strip the little space between the inner and outer gunwales and realized the outer gunwales have to come off when the new canvas is put on, so I should pull them off now.


I also removed the first piece of planking that will need to be replaced.  This gives me lots of room to work on the tips of the ribs.


Here are some of the planking nails I pulled out. You can see how they are bent from being hammered into the clinching iron.


Monday, May 23, 2011

Chipping away

I've been working on stripping a little each day and I finally got past the midpoint. It's going a little faster using the nasty stuff and with good weather I've been able to leave the garage door open while I work. I still need to go back and do a final clean-up and strip the inner gunwales.


 I moved the canoe to the other side of the garage so I can work in the shop more easily.  I don't think I'll be parking inside for a while. I cut pieces for the bow seat frame and set up the mortising attachment on the drill press (drill square holes!!). I'm keeping the original long pieces of the frame and making new side pieces so I can mortise the frame together rather than dowel it together, like it was done originally. The dowels didn't keep the frame pieces from rolling inward with the tension of the cane. 

Monday, May 9, 2011

More Tools

My father has moved into an apartment, so we moved most of his shop tools into my garage. It took a lot of work to clear out the accumulated junk to make room for everything. So now I have a bigger tablesaw, a bandsaw, lathe, spindle sander, thickness planer, drill press and innumerable hand tools.  Work on the canoe stopped for over a month, but it is worth it just to be better organized, not to mention the added tools.  Not in the picture is a rack with over 30 clamps.  I hear you can never have too many clamps.

I did a little more stripping tonight and tried the orange non-methyl chloride stripper.  It seems to work almost as well and is a lot less nasty to work with.  I think I'll still need the methyl chloride stuff to get the last layer off between the ribs.

Wednesday, March 23, 2011

Making the stem form

I used my laser level on a tripod to plot points on the wall to copy the contour of the stern stem. The bow stem is gone and I have to assume the contour is the same.  I set up the canoe parallel to the wall and level. I put the level on a small table with wheels, butted up against the big table under the canoe and used this arrangement to keep the laser beam perpendicular to the wall.

After I cut the curve in the cardboard, I checked the fit on the canoe.

I cut two pieces of 3/4" plywood to this contour, offset by an inch to allow for the thickness of the workpiece. I glued these together.


Then I cut holes to use to clamp the workpiece to the form.


Next up, a compression strap.

Saturday, March 12, 2011

Canoe cradles

I made some adjustable cradles to hold the canoe while I work on it.  The slings double as straps to hang the canoe up out of the way when I'm not working on it.


I drilled a series of holes in the vertical boards, so I can put the bolt that holds the strap in any position to raise or lower the canoe.

I also took out the bow seat so I can start rebuilding it.  The aft seat I reassembled with dowels, but I'm going to mortise and tenon the frame together on this one. I'll use some more of the maple from the Schmidt farm to replace the two short side pieces.

Sunday, February 13, 2011

More progress

The aft seat frame is sanded and almost ready for finish.  I needed to plane down one mismatched area where the new piece joined the old cross piece. The frame looks ok, but the new piece is lighter than the old pieces.  I need to look at bleaching the old parts to match.

I cut a circle of plywood to make a lid for the keg I'm using for a steam generator. I have a one inch hose that will connect to the steam box.  I'm still not sure what I will use for the steam box.


I bought a big propane burner to generate steam for steam bending.  This will end up as part of my home brewery.

Sunday, January 30, 2011

Aft seat frame

I made the missing piece and glued up the aft seat frame.  The old pieces are a bit crooked, so it's not as straight as I'd like. I'll see how it looks after the glue is dry, but it might need a do-over.

Another warm day

I finished stripping the three aft seat frame pieces yesterday.  It's obvious that they spent their effort on the top side of each piece.  The bottom sides are rough sawn and the tops are sanded smooth.  Today I'm making a hardware store run to get plywood to build the stem bending form. I'm planning on using some of the plywood to make a lid for my brewing keg so I can use it as a steam generator.

Saturday, January 1, 2011

Maple pieces from the farm

I found a few pieces of maple in Dad's basement to use as replacement parts on the canoe. This is maple from the big plank that was originally part of a stoneboat. The stoneboat was used to clear stones from the fields on the farm. A set of planks was milled with one end turned up about 30 degrees and attached together. A team of horses pulled this through the field, and stones were rolled onto the stoneboat to clear the field. 

I have one small piece that will be perfect for fixing the stern seat frame.  A second piece, about 2 x 3 x 30 turned out to be the perfect size to use for a replacement thwart. Only one of the thwarts (the cross pieces that tie the gunwales together) is original, and the other one is a rather crude softwood replacement. They were both originally maple, so this piece of wood will be perfect.